
Vue3已经发布很长一段时间了,如今vite2 + vue3现在可以说是前端最热门的开发组合,vue3最大的一个特性就是setup方法,可以让我们非常直观和方便的组合我们的业务逻辑和hooks。但是大部分逻辑代码都集中在setup方法里面,所以官方提供了一个实验性的写法,直接在script里面写setup的内容。
项目地址 https://gitee.com/cuiliang0302/vite2-vue3 https://github.com/cuiliang0302/vite2-vue
一、vite创建项目
1. 创建项目
npm init vite@latest
2. 安装依赖并运行项目
cd projectName
npm install
npm run dev
- 如果遇到如下报错
/Users/cuiliang/coding/myblog_pc/node_modules/esbuild/bin/esbuild:2
throw new Error(`esbuild: Failed to install correctly
^

Error: esbuild: Failed to install correctly

Make sure you don't have "ignore-scripts" set to true. You can check this with
"npm config get ignore-scripts". If that returns true you can reset it back to
false using "npm config set ignore-scripts false" and then reinstall esbuild.

If you're using npm v7, make sure your package-lock.json file contains either
"lockfileVersion": 1 or the code "hasInstallScript": true. If it doesn't have
either of those, then it is likely the case that a known bug in npm v7 has
corrupted your package-lock.json file. Regenerating your package-lock.json file
should fix this issue.
- 手动运行
node node_modules/esbuild/install.js来解决esbuild安装问题。
3. 更新vue版本
npm install vue@next
二、vite配置
1. 在根目录下vite.config.js文件中添加alias
import {defineConfig} from 'vite'
import vue from '@vitejs/plugin-vue'
import path from 'path';
// https://vitejs.dev/config/
export default defineConfig({
    alias: {
        '@': path.resolve(__dirname, 'src')
    },
    plugins: [vue()]
})
2. 使用方法:修改src/App.vue
<script setup>
// 原方式
// import HelloWorld from './components/HelloWorld.vue'
// 别名引用
import HelloWorld from '@/components/HelloWorld.vue'
</script>
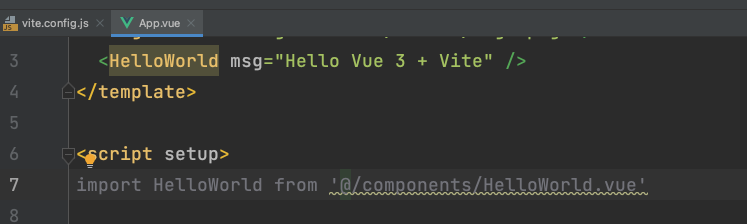
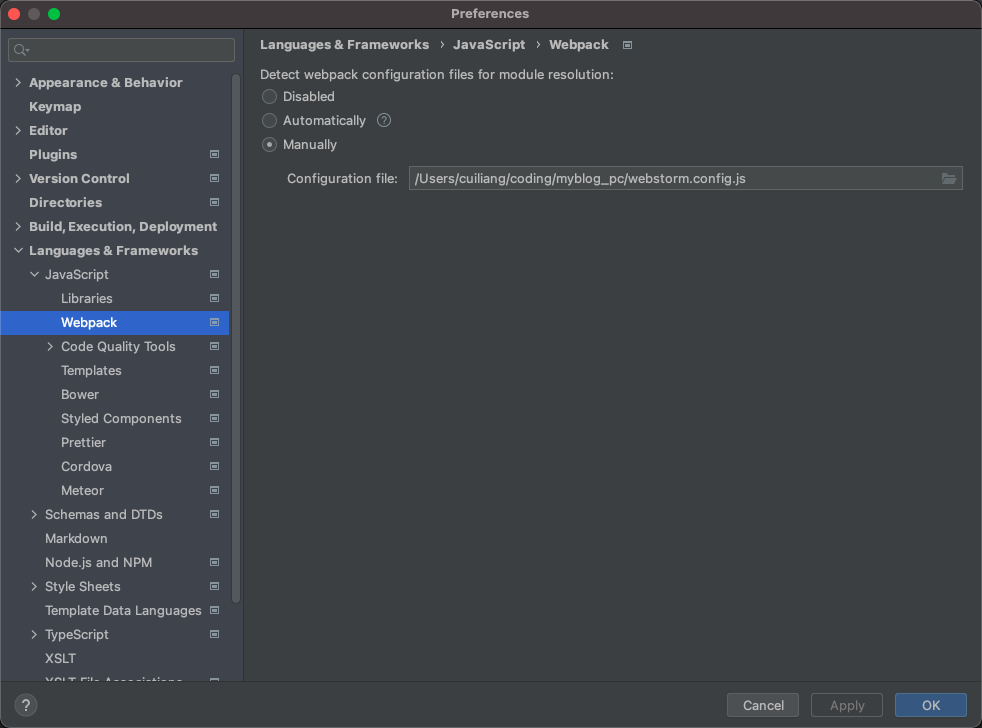
3. 如果使用webstorm并不能自动识别别名。需要手动指定webstorm配置文件
- 在项目的根目录新建一个新文件 webstorm.config.js
'use strict'
const path = require('path')

function resolve (dir) {
    return path.join(__dirname, '.', dir)
}

module.exports = {
    context: path.resolve(__dirname, './'),
    resolve: {
        extensions: ['.js', '.vue', '.json'],
        alias: {
            '@': resolve('src'),
        }
    }
}
- 进入 WebStorm preferences -> Language & Framework -> JavaScript -> Webpack,选择这个文件即可
- 实际开发过程中发现webstorm对script setup智能提示并不完全适配。预计2021.2版本解决这个问题。参考issue:https://youtrack.jetbrains.com/issue/WEB-49000
三、setup script
1. vue3原始script写法
<template>
  <div @click="show">
    <Card>{{msg}}</Card>
  </div>
</template>
<script>
import { ref } from "vue";
import Card from '@/components/Card.vue';
export default {
  name: "demo",
  components: {
    Card,
  },
  setup() {
    const msg = ref("setup script");
    const show = () => {
      console.log('这是show方法')
    }
    return { msg,show };
  }
}
</script>
vue3中所有组件必须导入并注册,而且定义的变量和方法需要逐个return出来给template使用。
2. setup script写法
<template>
  <div @click="show">
    <Card>{{msg}}</Card>
  </div>
</template>
<script setup>
import { ref } from "vue";
import Card from '@/components/Card.vue';
const msg = ref("setup script");
const show = () => {
  console.log('这是show方法')
}
</script>
当 <script> 标签具有 setup 属性时,组件在编译的过程中代码运行的上下文是 setup() 函数中。所有 ES 模块导出都被认为是暴露给上下文的值,并包含在 setup() 返回对象中,大大提高了项目开发效率。
3. setup script使用示例
分别创建src/components/HelloWorld.vue(父组件)和src/components/Test.vue(子组件)。演示setup script的基本用法
- HelloWorld.vue(父组件)
<template>
  <h1>这是父组件,名字叫{{ name }}</h1>
  <button type="button" @click="valueAdd">
    count is: {{ state.count }}
  </button>
  <hr/>
  <Test msg="吃了吗?" :status="state.count%2===0 ? '没吃饭' : '吃饭了'" @toFather="toFather"/>
</template>

<script setup>
// 引入组件
import {ref, reactive, onMounted} from 'vue'
import Test from '@/components/Test.vue';
// 定义变量
const name = ref('张三')
const state = reactive({count: 0})
// 定义方法
const valueAdd = () => {
  state.count++
}
// 获取子组件的传值
const toFather = (value) => {
  alert('父组件收到子组件的传值:' + value)
}
// 生命周期函数
onMounted(() => {
  console.log("执行onMounted函数")
});
</script>

<style scoped>
a {
  color: #42b983;
}
</style>
- Test.vue(子组件)
<template>
  <h1>这是子组件,名字叫{{ name }}</h1>
  <p>父组件给子组件传的值是————>{{ msg }}——{{ status }}</p>
  <button type="button" @click="toFather">
    向父组件传值
  </button>
</template>

<script setup>
// 引入组件
import {ref} from "vue";
// 定义变量
const name = ref('李四')
// 组件属性参数(子组件接收父组件传值)
const props = defineProps({
  msg: String,
  // 参数校验与默认值
  status: {
    type: String,
    required: false,
    default: '未定义',
  },
})
// 定义事件(子组件向父组件传参)
const emit = defineEmit(['toFather']);
const toFather = () => {
  emit('toFather', '112233');
}
</script>

<style scoped>

</style>
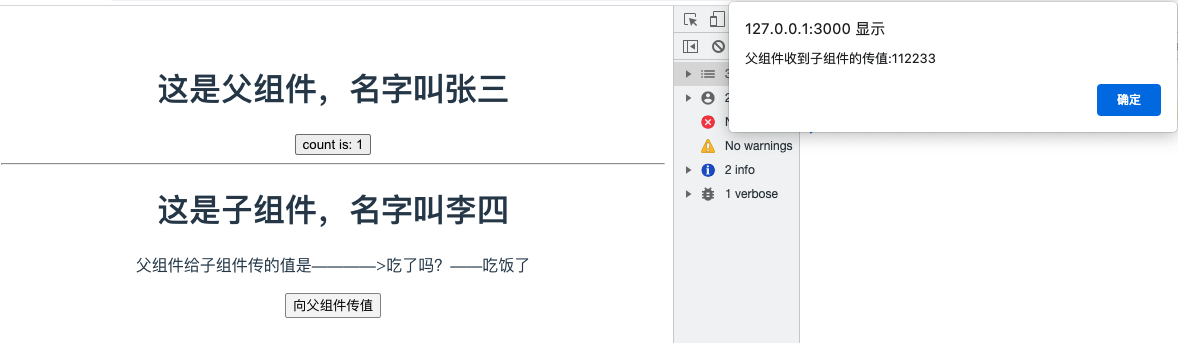
- 效果演示
四、加入vue-router
1. 安装
npm install vue-router@4 -S
2. 创建配置文件
src/router/index.js
import {createRouter, createWebHistory} from 'vue-router';

const router = createRouter({
    // history: createWebHashHistory(),  // hash模式,
    history: createWebHistory(),  //h5模式createWebHistory
    routes: [
        {path: '/', component: () => import('@/views/Home.vue')},
        {path: '/test', component: () => import('@/views/Test.vue')}
    ]
})
// 路由导航守卫
// router.beforeEach((to, from, next) => {
//  // to 访问的路径 from 从哪来 next 响应路径
//  if (to.meta.isAuth === true && JSON.stringify(store.state.userSession) === '{}') {
//      Toast.fail('还未登录,即将跳转至登录页')
//      return next('/login_register')
//  } else {
//      next()
//  }
// })
export default router;
3. 在 main.js 中引入
import {createApp} from 'vue'
import App from './App.vue'
import router from '@/router';

const app = createApp(App)
app.use(router)
app.use(store)
app.mount('#app')
4. 在App.vue中使用
<template>
  <!-- 路由匹配到的组件将渲染在这里 -->
  <router-view></router-view>
</template>

<script setup>
</script>

<style>
</style>
五、加入vuex
1. 安装
npm install vuex@4 -S
- 想要将vuex数据持久化,还需要安装vuex-along
npm install vuex-along -S
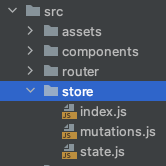
2. 创建配置文件
- src/store/index.js
import {createStore} from 'vuex'
import mutations from '@/store/mutations'
import state from "@/store/state";
import createVuexAlong from 'vuex-along'

export default createStore({
    state,
    mutations,
    plugins: [
        createVuexAlong({
            local: {
                list: [],
            },
            session: {
                list: ["count"],
            }
        })
    ]
})
- src/store/state.js
const state = {
    count: 0
}
export default state
- src/store/mutations.js
const mutations = {
    add(state) {
        state.count++
    }
}
export default mutations
3. 在 main.js中引入
import {createApp} from 'vue'
import App from './App.vue'
import router from "@/router";
import store from '@/store';

const app = createApp(App)
app.use(router)
app.use(store)
app.mount('#app')
4. 在Home.vue中使用store
<template>
  <h1>{{ msg }}</h1>
  <h1></h1>
  <button @click="$store.commit('add')">count is: {{ $store.state.count }}</button>
  <p>Edit <code>components/HelloWorld.vue</code> to test hot module replacement.</p>
</template>

<script>
export default {
  name: 'HelloWorld',<template>
  <h1>这是首页</h1>
  <button @click="valueAdd">{{ value }}</button>
</template>

<script setup>
import store from '@/store/index'
import {computed} from "vue";

const value = computed(() => store.state.count)
const valueAdd = () => {
  store.commit('add')
}
</script>

<style scoped>

</style>
  props: {
    msg: String
  }
}
</script>
六、加入SASS
1. 安装sass
npm install sass -D
npm install sass-loader -D
npm install node-sass -D
2. 安装normalize.css初始化样式
npm install --save normalize.css
3. 新建style目录保存各种样式
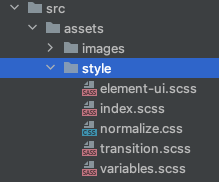
4. index.scss中组织这些样式,并编写全局样式
@import "./normalize.css";
@import "./element-ui.scss";
@import "./transition.scss";
@import "./variable.scss";
@import "./theme.scss";

body {
  margin: 0;
  padding: 0;
  box-sizing: border-box;
  background-color: $color-background-base;
}
5. main.js中引入index.scss
import {createApp} from 'vue'
import App from './App.vue'
import router from '@/router';
import store from '@/store';
import '@/assets/style/index.scss'

const app = createApp(App)
app.use(router)
app.use(store)
app.mount('#app')
6. vite.config.js添加全局scss变量文件
import {defineConfig} from 'vite'
import vue from '@vitejs/plugin-vue'
import path from 'path';
// https://vitejs.dev/config/
export default defineConfig({
    alias: {
        '@': path.resolve(__dirname, 'src')
    },
    plugins: [vue()],
    css: {
        preprocessorOptions: {
            scss: {
                additionalData: `@import "@/assets/style/variable.scss";`
            }
        }
    }
})
7. Home.vue使用全局变量
<template>
    <h1>这是首页</h1>
    <button @click="valueAdd">{{ value }}</button>
</template>
<script setup>
    import store from '@/store/index'
    import {computed} from "vue";
    const value = computed(() => store.state.count)
    const valueAdd = () => {  store.commit('add')}
</script>
<style scoped lang="scss">
h1 {
    color: $color-primary;
}
</style>
七、加入axios
1. 安装axios
npm i axios -D
2. 封装axios
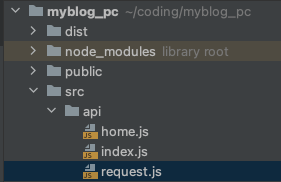
- src/api/home.js
import index from './index'
- src/api/index.js
import {request} from './request'

const index = {
    get(url, params) {
        const config = {
            method: 'get',
            url: url
        }
        if (params) config.params = params
        return request(config)
    },
    getFile(url, params) {
        const config = {
            method: 'get',
            url: url,
            responseType: 'blob'
        }
        if (params) config.params = params
        return request(config)
    },
    post(url, params) {
        const config = {
            method: 'post',
            url: url
        }
        if (params) config.data = params
        return request(config)
    },
    put(url, params) {
        const config = {
            method: 'put',
            url: url
        }
        if (params) config.data = params
        return request(config)
    },
    delete(url, params) {
        const config = {
            method: 'delete',
            url: url
        }
        if (params) config.params = params
        return request(config)
    }
}
export default index
- src/api/request.js
import axios from 'axios'

export function request(config) {
    // 创建axios的实例
    const instance = axios.create({
        baseURL: import.meta.env.VITE_APP_BASE_URL,
        timeout: 20000
    })
    // 请求拦截器配置
    instance.interceptors.request.use(config => {
            // config.headers.Authorization = window.sessionStorage.getItem('token')
            return config
        }, error => {
            console.log(error)
            return Promise.error(error)
        }
    )
    // 响应拦截器配置
    instance.interceptors.response.use(response => {
        return response.data
    }, error => {
        console.log(error)
        switch (error.response.status) {
            case 400:
                return Promise.reject(error.response.data)
            case 401:
                console.log("无权访问")
                break
            case 403:
                console.log("token过期啦")
        //window.location.href="/login"
                break
            case 404:
                console.log("404啦")
                break
            default:
                return Promise.reject(error)
        }
        return Promise.reject(error)
    })
    // 发送真正的网络请求
    return instance(config);
}

export default request
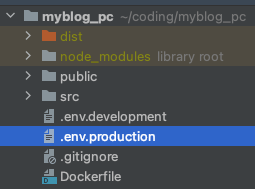
3. 开发生产环境变量
项目开发过程中通常会有好几个环境,比如dev.test.development等模式,往往我们也需要在不同的环境下会有些值对应会变化,最常见的就是后台的接口api,开发环境的api和生产环境的api是不一致的,所以我们需要进行配置,在vite中我们需要进行这样的配置。参考文档:https://cn.vitejs.dev/guide/env-and-mode.html#env-files
- package.json指定mode
{
  "name": "myblog_pc",
  "version": "0.0.0",
  "scripts": {
    "dev": "vite --mode development",
    "build": "vite build --mode production",
    "serve": "vite preview"
  },
  …………
}
- 项目根目录创建.env.development文件
ENV= 'development'
VITE_APP_TITLE = '测试环境'
VITE_APP_BASE_URL = 'http://127.0.0.1:8000/'
- 项目根目录创建.env.production文件
ENV= 'production'
VITE_APP_TITLE = '生产环境'
VITE_APP_BASE_URL = 'https://api.cuiliangblog.cn/'
- src/api/request.js使用环境变量
// 创建axios的实例 const instance = axios.create({ baseURL: import.meta.env.VITE_APP_BASE_URL, timeout: 20000 })
八、加入element-plus
1. 安装element-plus
npm install element-plus --save
2. 安装lodash
npm install lodash --save
3. 全局引入element-plus(不推荐)
import {createApp} from 'vue'
import App from './App.vue'
import '/style/index.scss'
import {router} from './router'
import store from './store'
import ElementPlus from 'element-plus'
import 'element-plus/lib/theme-chalk/index.css'
const app = createApp(App)
app.use(router)
app.use(store)
app.use(ElementPlus)
app.mount('#app')
4. 手动按需引入element-plus(推荐)
- 创建配置文件plugins/ElementPlus.js
import {ElButton} from 'element-plus'
import 'element-plus/lib/theme-chalk/el-button.css'

export default function (app) {
  app.use(ElButton)
}
- main.js引入
import {createApp} from 'vue'
import App from './App.vue'
import '/style/index.scss'
import {router} from './router'
import store from './store'
import ElementPlus from './plugins/ElementPlus'
const app = createApp(App)
app.use(router)
app.use(store)
app.use(ElementPlus)
app.mount('#app')
5. 自动按需引入element-plus(强烈推荐)
npm install vite-plugin-style-import -D
- 修改vite.config.js
import {defineConfig} from 'vite'
import vue from '@vitejs/plugin-vue'
import path from 'path';
import styleImport from 'vite-plugin-style-import'
// https://vitejs.dev/config/
export default defineConfig({
    alias: {
        '@': path.resolve(__dirname, 'src')
    },
    plugins: [
        vue(),
        styleImport({
            libs: [{
                libraryName: 'element-plus',
                esModule: true,
                ensureStyleFile: true,
                resolveStyle: (name) => {
                    name = name.slice(3)
                    return `element-plus/packages/theme-chalk/src/${name}.scss`;
                },
                resolveComponent: (name) => {
                    return `element-plus/lib/${name}`;
                },
            }]
        })
    ],
    css: {
        preprocessorOptions: {
            scss: {
                additionalData: `@import "@/assets/style/variable.scss";`
            }
        }
    }
})
- 创建配置文件plugins/ElementPlus.js
import {ElButton} from 'element-plus'

export default function (app) {
  app.use(ElButton)
}
- main.js引入
import {createApp} from 'vue'
import App from './App.vue'
import '/style/index.scss'
import {router} from './router'
import store from './store'
import ElementPlus from './plugins/ElementPlus'
const app = createApp(App)
app.use(router)app.use(store)
app.use(ElementPlus)
app.mount('#app')
- src/views/Home.vue使用
<template>
  <h1>这是首页</h1>
  <button @click="valueAdd">{{ value }}</button>
  <el-button type="primary">主要按钮</el-button>
</template>

<script setup>
import store from '@/store/index'
import {computed} from "vue";

const value = computed(() => store.state.count)
const valueAdd = () => {
  store.commit('add')
}
</script>

<style scoped lang="scss">

h1 {
  color: $color-primary;
}
</style>
九、使用typescript
1. 安装typescript
npm install typescript
2. 初始化ts配置文件
tsc -init
然后将tsconfig.json中的"strict"改为false
3. 修改 main.js文件类型
将 main.js 改为 main.ts
4. 修改index.html引入
将 index.html 中引入的 main.js 改为 main.ts。
5. 添加类型声明文件
ts只认识以
.ts结尾的文件,并不认识.vue结尾的文件,因此要在项目的/src文件下创建一个.d.ts文件来定义一下.vue文件:
// src/main.d.ts
declare module '*.vue' {
    import {ComponentOptions} from 'vue';
    const componentOptions: ComponentOptions;
    export default componentOptions;
}
6. 编写ts测试代码
现在就可以 app.vue 中使用 TypeScript
<script lang="ts">
import HelloWorld from './components/HelloWorld.vue'

export default {
  name: 'App',
  components: {
    HelloWorld
  },
  setup(){
    const msg:string = 'hello'
    alert(msg)
  }
}
</script>
十、docker部署运维项目
1. dockerfile
FROM node:14.16.0 AS build
COPY . /opt/myblog_pc
WORKDIR /opt/myblog_pc
RUN npm install && npm run build

FROM nginx:1.18.0
COPY --from=build /opt/myblog_pc/dist /opt/myblog_pc/dist
COPY nginx.conf /etc/nginx/nginx.conf
CMD ["nginx", "-g","daemon off;"]
2. nginx.conf
user root;
worker_processes auto;
error_log /var/log/nginx/error.log;
pid /run/nginx.pid;
# Load dynamic modules. See /usr/share/doc/nginx/README.dynamic.
include /usr/share/nginx/modules/*.conf;
events {
    worker_connections 1024;
}
http {
    log_format  main  '$remote_addr - $remote_user [$time_local] "$request" '
                      '$status $body_bytes_sent "$http_referer" '
                      '"$http_user_agent" "$http_x_forwarded_for"';
    access_log  /var/log/nginx/access.log  main;
    sendfile            on;
    tcp_nopush          on;
    tcp_nodelay         on;
    keepalive_timeout   65;
    types_hash_max_size 2048;
    include             /etc/nginx/mime.types;
    default_type        application/octet-stream;
    # Load modular configuration files from the /etc/nginx/conf.d directory.
    # See http://nginx.org/en/docs/ngx_core_module.html#include
    # for more information.
    include /etc/nginx/conf.d/*.conf;
    server {
        listen       80;
        server_name  pc.cuiliangblog.cn 127.0.0.1;
        location / {
            root  /opt/myblog_pc/dist;
            index  index.html index.htm;
            try_files $uri $uri/ /index.html;
            add_header Access-Control-Allow-Origin *;
        }
    }
}
3. 打包并运行项目
docker build -t myblog_pc:v1 .
docker run -d -p 80:80 myblog_pc:v1